To upgrade Google tag to GTM safely, opt in from the banner in your container, review what gets connected, then preview, test, verify and publish. The aim is one hop to GA4 and Ads instead of two. Always check external account links afterwards, especially across client accounts.
Google has been reshaping how its tag and Tag Manager products work together, with the aim of one setup, fewer moving parts and easier debugging. If you run GA4 or Google Ads tracking, you should understand the change before you touch anything. This guide explains how to upgrade Google tag to GTM safely, and it should help you plan the work for 2027. Interfaces and rollout vary by account, so check Google's current documentation before you start.
What changes in plain terms
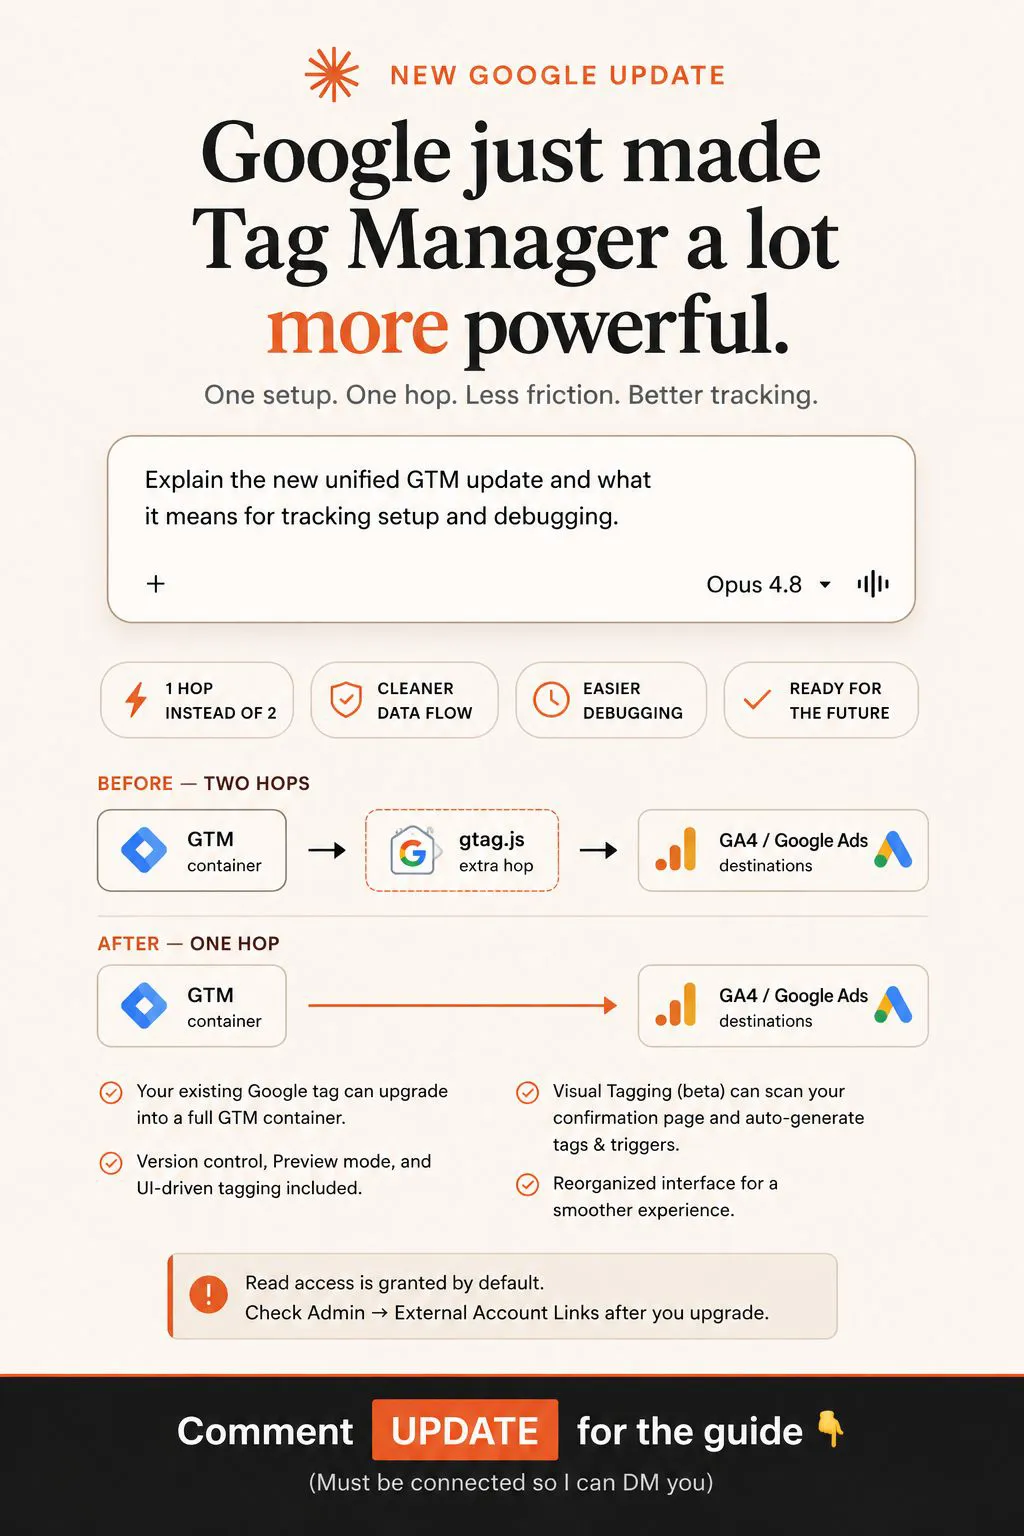
The old path ran from Tag Manager through gtag.js and then to GA4 or Ads. The newer approach shortens that to Tag Manager straight to GA4 or Ads. One hop instead of two means fewer moving parts, cleaner data and simpler debugging.
Other changes I noticed in the experience:
- An existing Google tag can be upgraded into a full container without a rebuild.
- Version control, preview mode and UI-driven tagging come with it.
- The interface is reorganised, with configuration under settings and triggers and variables under an advanced area.
- A beta visual tagging tool can scan a confirmation page and suggest tags and triggers.
The one thing to watch: account links
The optimisation flow can auto-link your container to your Google destination accounts, and read access may be granted by default. That is easy to miss in a hurry.
After you upgrade, open the admin area and review external account links to see exactly what got connected. If you manage multiple client accounts, do not skip this step. You do not want a link you did not intend, in an account you are responsible for, because a banner offered a shortcut.
How to upgrade Google tag to GTM step by step
Nothing needs to change automatically. Opt in deliberately and work through this order.
- Document the current state. Export the container, note which tags fire where, and record your key conversions with today's counts.
- Start with a low-risk property. Do not begin with your biggest client or highest-spend account.
- Opt in from the banner. Read what each prompt will do before accepting it.
- Preview. Use preview mode and walk through the real user journeys: page view, lead form, checkout or booking.
- Test. Confirm events reach GA4 and conversions reach Google Ads, with the right values and no duplicates.
- Verify. Compare numbers for several days against your baseline and your backend records.
- Publish. Only then publish live, with a clear version name and a note about what changed.
- Review account links. Check external links one more time and remove anything unexpected.
Common mistakes to avoid
- Publishing straight after upgrading without testing real conversions.
- Leaving duplicate tags that fire alongside the upgraded setup, which inflates counts.
- Forgetting consent settings, which should be rechecked after any tagging change.
- Changing several accounts on the same day, so you cannot tell which change caused a problem.
Smart Bidding learns from your conversion data, so a messy migration can quietly teach the algorithm the wrong lessons. That is why testing matters more than speed.
Should you upgrade now or wait?
If your tracking is stable and the account holds meaningful spend, it is reasonable to wait until you have time to test properly. If you are building a new setup, starting on the newer structure usually makes sense. Either way, treat it as a planned change, not a click-through.
Write a short rollback plan before you publish: which version to restore, who has the permission to do it, and how you will notice a problem quickly. A tracking change that goes wrong on a Friday can cost days of clean data, so schedule upgrades when you can watch the numbers.
If you want a second set of eyes on a migration, my analytics and tracking work covers audits and clean upgrades. You can also read the free guides for testing routines you can reuse.
This article expands on my post on LinkedIn ↗.
FAQ
Does the upgrade happen automatically?
In what I have seen, no. It is opt-in through a banner in your container. Check Google's current documentation, since interfaces and options change.
What should I check after upgrading?
Open the admin area and review external account links to see exactly what was connected, including any read access granted by default, then test your key conversions.
Is it safe for agencies managing many accounts?
Yes, if you go account by account, review links each time, and follow a fixed preview, test, verify and publish routine.